Thursday, 29 April 2010

Competitions!


A new paper craft shop has recently opened in a local town. I'm really excited about this as the nearest craft shop so far has been in either York or Darlington, which are a good 30 minute drive from home. The shop is called 'The Paperlane', and for anyone who is interested, leave a comment and I can give you directions.

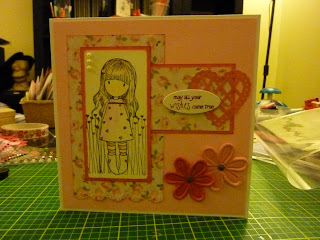
I haven't actually visited the shop yet, but I have entered their competition to win £30 of crafting goodies. OK, the photo I took is rubbish because of the lighting, but I think you can see pretty much the idea of the card.

This is the first time I have ever used making techniques and I was really please with the way it turned out. I used one of my clear cupid flower stamps with a brown ink over the original black inked gorjuss girl. Then I coloured her using whispers markers (in my opinion as good as pro-markers and much cheaper).

In other news I splashed out today and bought a cuttlebug. I've been toying with the idea of buying an embossing machine, but I've always been reluctant because of the cost (around £50). I think I'll use the embossing folders more than the die cuts. I really haven't found a way to get on with die cuts in general, but maybe the cuttlebug will inspire me.

Does anyone have any top cuttlebug tips?


Wednesday, 21 April 2010

Silicone Glue, Opinions Please!

I was recently introduced to silicone glue. Originally I was super reluctant to use it for 2 main reasons.

1. I hate getting sticky fingers when I'm crafting.
2. It's stupidly expensive (or so I believed).

I gave it a whirl though and I've come up with some of my own ideas and tips, as well as some information I got from other crafters which was really useful.

Tip 1
Use sparingly. It's quite heavy stuff so if you apply too much to your card it can make it unbalanced. I had one of my first decoupage cards I did using silicone be so front heavy that it wouldn't stand up! You really only need little dabs on the outer edges, the centres seem to hold up ok on their own if you use high quality decoupage sheets.

Tip 2
Beware seepage. If you use it to stick buttons of gems you really only need the tiniest amount. Any more than than and it all oozes out. This can make a huge mess on your card!

Tip 3
Watch your fingers. The type I use is quite stringy, so if you get it on your fingers it can go all over (this was one reason why I was reluctant to try it out in the first place). Even better, use an applicator tip.

Tip 4
Buy odourless. The first tube I bought was really stinky, even after it dried. I would hate to receive a stinky card!

Tip 5
When you're done using the tube for the day, make sure the lid is on tight and if you're using an applicator push out a little extra glue and let it dry in the tip. Next time you use it, just pull out the dry part and hey presto, clear tip. (A lady at the GNPE told me this, thank you!)

Generally I think it's a good product. It's flexible, so you can move layers around for a while after you have laid them down and I found you can also put bigger blobs on one part than another to make a layer less 'horizontal'. Price wise, it seems expensive, but you actually get a lot of use out of one tube, and I'd say that it's comparable if not slightly cheaper than buying 3D foam squares. Its also much quicker and easier than the 3D foam pads, and less fiddly as there is no peeling!

What are your experiences with 3D work and attaching plastic/ foam embellishments, and do you have any top crafting tips?


Sunday, 11 April 2010

Just a note to say....


Hooray for lazy Sundays! Yesterday I went to York with my Mum for a spot of shopping so today has been spent working on my range. I've decided that I need to expand the range of things I stock in my etsy store, so I've been working on some ideas for notecard sets. I posted the emo bunny and zombie squirrel sets here a few posts back.

Today I was inspired by the lovely spring weather and decided to make something bright and cheerful. I bought some mini mini cards of ebay that measure about 6cm by 9cm (give or take a few mm). I love making mini items, there's something really appealing about making something small but pretty, right?


Using my bunny buttons (also an ebay bargain), I used them as a topper mounted on some super funky paper. The buttons come with a little wooden hole thing on the back that sticks out, but i just break it off and file it down smooth, then the button sits flush against the card.

Then I made a matching box using my easy score scoring board and bone folder. I glued the box together using finger lift tape AND silicone glue so there's no way this baby is going to unfold itself!

All in all I was really pleased with the results. What do you think?

Thursday, 8 April 2010

Failures...Just How Should We Deal?

I thought for today's post that rather than just talk about cards, I'd talk about a few failures in my life and how I dealt with them. It's always instructive to hear about how other people deal with failures, right?

This all does lead back to crafting so bear with me a while, come on, humour me!

One of my first failures in life was getting sacked. People who know me would tell you a. that they can't believe that happened, and b. I bet that upset you. And I would have to say, yes, you're 100% correct! I worked as a waitress from the age of 15. The money wasn't great and I didn't like the job. It was unsociable hours and I was much more shy as a child than I am now. Anyway, the boss phone me one day and said 'don't come back'. It was a bit of a bolt out of the blue. I'd not done anything wrong and the boss was rather vague in his reasoning.

How did I react? Well, firstly I cried, then cried a bit more, and then I got really angry. I blamed it on them. How could they possibly not want me?! What was wrong with me?! I got my Mum to call them and tell them how upset I was and ask for an explaination. Needless to say there was never an explaination, and despite my best attempts to think otherwise, I still see it as a conspiracy. Maybe they were just over staffed?

Anyway, I would classify my emotions as denial, shame and then anger.

So what does this have to do with crafting?! Stay with me, I'm getting there!

Art and crafting are those kind of hobbies where you make repeated mistakes and fail on numerous occasions. How many times have you almost finished a card, only to smudge the ink, get glue in the wrong place, notice it's not all square and there are wonky bits?? For me, this happens every time I craft!

I hear a lt of people say 'there's no such thing as a mistake, just happy accidents'. Well, I only agree with this partially. Some mistakes do ruin pieces, and there's no point carrying on with a piece you're not happy with. Personally, if I mess up, I'm not the type to try and cover it up (although I have done in the past!) I'd rather start again.

And I suppose that's the whole point of my post. We all make mistakes, so don't try to cover it up. Over my few years of adult life *cough cough*, I've taken on the opinion that it's better to 'fess up' and start again. There's no point getting overly emotional. If you feel guilty, it stunts your creativity. If you feel ashamed, you will ruin your confidence. If you get angry you'll probably not get anything else right that day.

Let me illustrate my current approach to failure. About 6 months ago I booked a craft fair with my family. My Mum and sister both agreed to pay towards the table fee and sell their items alongside me. On the day we turned up to find it was an antiques fair (bad news!) and I sold 2 cards the entire day. All in all between the three of us we barely made enough to cover a takeaway after the fair!

So what did I do? Back in the day, when I was 15 I would have probably got sad (cried), angry (complained to the organiser) and then got my Mum to complain too. My approach was so different that it struck me how much real life experience really does change character.

1. I accepted that I'd chosen the wrong venue, and decided to always check the venue for future fairs BEFORE handing over any money.
2. I apologised to my family for the mess up.
3. I went out and bought a cookie cake iced with 'At Least We Tried', which we ate as a family that evening.

The moral of this story is that in my opinion we have to accept responsibility for our failures, learn from them, and then LAUGH about them when we feel the time is right to do so. We all mess up! I'm sure even the queen has smashed the odd family heirloom.

So how about you? What's your philosophy on failure?
Monday, 5 April 2010

Bank Holiday Fun


Well, I managed to book the whole bank holiday weekend off work this year, so decided to spend a good deal of my time crafting! I've been using my new stamp carving set to great effect. I've made some sets of 4 notecards each, using some really high quality card blanks I managed to find at a really good price. I enjoyed the ease of making these. It's quite easy to get bogged down in the detail when you are card making, so to do something really simple but striking is a breath of fresh air.


We did intend to go to the car boot sale today. I love scouting round the stalls for postcards and stamps, as well as second hand books. I love really old postcards of mountains and am building up quite a collection. Anyway, it was drizzling with rain and when we arrived there were a grand total of 3 stalls and no other cars! So instead we decided to head over to the Range.

Although I promised myself I would just browse, I ended up buying the vintage shades of the whisper marker pens and a blender pen. I've been using watercolours recently, but thought I could re-visit the markers and see how it went. To my surprise the marker pens are quite versatile and can be used in a similar way to watercolour pencil crayons. I'll post some of the results at a later date!

Friday, 2 April 2010

Hand Carved Stamps


In an effort to add a dash of originality to my cards I decided that I would like to carve some of my doodles into rubber stamps. I've been drawing little cartoon characters for a while now, but usually they just sit around in a little sketch book and there's only really my other half and I who look at them.

I bought a product called 'easy carve', which is a much more adaptable product that the traditional lino tiles that we used when I did my art A-Level. The rubber is much more pliable and doesn't crumble around delicate little areas. It's really simple to use too. All you do is press your pencil drawing into the tile, and carve away! The set I bought came with two cutting tools, one of which was super small and good for the detailed areas.

Here are the results!
What do you think? What are your experiences with carving your own stamps and how do you think the finished images compare to shop bought?